
If you’re still choosing a dash cam, see our comparison of the best dash cams for 2026.
Driving with a dash cam can give you peace of mind, clearer evidence if something goes wrong, and sometimes even lower insurance costs. This guide walks through how to install a dash cam in a calm, beginner‑friendly way, with a focus on UK rules and everyday cars.
1. Why install a dash cam
A dash cam is a small camera that records the road while you drive. It usually sits at the top of your windscreen and runs automatically when the car has power.
In the UK, dash cams are widely accepted by insurers and the police as useful evidence after an incident. Footage can help show who was at fault in a collision, capture number plates after a hit‑and‑run, or support your version of events during an insurance claim.
Many drivers also find dash cams reassuring for day‑to‑day use. They quietly record in the background and only need attention if something happens, acting as a “black box” for your car.
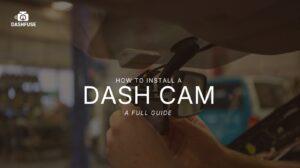
2. What you need before installing
You do not need to be technical to install a basic dash cam. It helps to gather a few simple items before you start.
-
The dash cam itself and its power cable (usually a long USB cable with a 12V plug).
-
A suitable memory card (often a microSD card of the size recommended in the camera’s manual).
-
A clean microfibre cloth and some glass cleaner for the inside of the windscreen.
Optional but helpful:
-
A plastic trim removal tool (safer than metal for tucking cables).
-
A few small cable clips or zip ties to tidy wires.
Before fitting anything permanently, sit in the driver’s seat and check where the camera can go without blocking your view. You should also identify where your 12V socket is (what many still call the cigarette lighter) and where the fuse box is if you think you might hardwire later.
3. Front‑only vs front‑and‑rear setups
Dash cams come in two main configurations, and it helps to decide which one you want before planning cabling.
Front‑only dash cams
These record what happens in front of your vehicle. They are simpler to install because all the wiring stays at the front of the car, and you only need to route one power cable up to the windscreen.
Front‑and‑rear (dual) dash cams
These include an additional small camera for the rear window, connected to the front unit by a long cable. You get coverage for rear‑end bumps, parking scrapes from behind, and more complete footage in multi‑car incidents.
A front‑only system is usually quicker for beginners. A front‑and‑rear setup takes longer because you need to run the rear cable through the length of the car, but it gives more comprehensive coverage once installed.
4. Step‑by‑step installation process
This section covers a straightforward method using the car’s 12V socket. It suits most people and does not require touching the fuse box.
Step 1: Test the dash cam
-
Sit in the car with the engine safely off but ignition on.
-
Plug the dash cam into the 12V socket using the supplied cable.
-
Check that it powers on and begins recording.
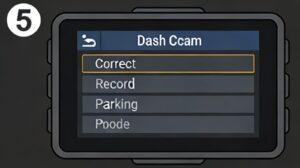
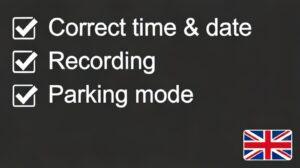
-
Make sure the date, time and basic settings are correct (these are often in a simple menu).
Once you know it works, unplug it and move to positioning.
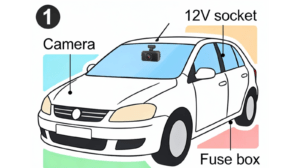
Step 2: Choose a legal mounting position
In the UK, a dash cam must not seriously obstruct your view or intrude into the area the windscreen wipers cover in front of the driver.
Good practice is to:
-
Mount it high up, behind or just to the passenger side of the rear‑view mirror.
-
Keep it outside your main line of sight while still letting the lens “see” clearly through the glass.
-
Avoid areas with dense black dots or shading at the top of the windscreen, which can affect image quality and suction.
Clean the glass with your cloth and cleaner so the adhesive pad or suction mount sticks securely.
Step 3: Attach the dash cam mount
-
Peel the backing off the adhesive pad or fix the suction cup where you planned.
-
Press firmly for the time recommended in the instructions so it bonds well.
-
Slide or clip the camera body onto the mount.
Sit back in the driver’s seat and check that:
-
The camera is not blocking your view.
-
The lens is pointing roughly at the road, not too high at the sky or low at the bonnet.
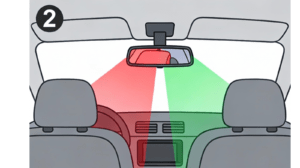
Step 4: Route the front camera cable
-
Plug the cable into the camera.
-
Gently tuck the cable into the gap between the windscreen and the headliner (the trim at the top), starting from the camera and working towards the passenger‑side A‑pillar.
-
Run the cable down the passenger‑side A‑pillar, being careful not to disturb any airbag labels or wiring in that area.
-
Continue routing under the glove box or along the edge of the dashboard until you reach the 12V socket.
Use small self‑adhesive clips or existing trim gaps to keep the cable out of the way of pedals, steering column and controls.
Step 5: Install and connect a rear camera (if you have one)
If you have a rear camera:
-
Choose a spot at the top of the rear window, ideally in the centre, where the wiper covers the glass (for a clear view).
-
Clean the glass and attach the rear camera using its adhesive pad.
-
Plug the long rear cable into the rear camera and start routing it along the top of the headliner towards the front, usually along the passenger side.
-
For hatchbacks or estates, guide the cable through the flexible rubber boot between the body and tailgate if possible, taking your time not to damage the rubber.
-
Continue forward along the roofline, down the pillar, and to the front dash cam, hiding the cable behind trim and door seals as you go.
Finally, plug the rear cable into the front dash cam. The rear camera usually takes power from the front unit, so you still only need one main power source.
Step 6: Power up and check the view
Plug the 12V adapter into the socket, switch on the ignition, and check:
-
The camera powers up automatically.
-
The image looks straight and level.
-
For dual systems, you can see both front and rear views in the menu or on screen.
Adjust the angle slightly if needed, then tighten any adjustment screws or clips so the camera does not droop over time.
Cable routing tips
Neat cable routing makes daily use easier and reduces the chance of cables getting caught, damaged, or interfering with safety systems.
Useful tips:
-
Always route along the passenger side where possible to keep cables away from pedals and the steering column.
-
Use plastic trim tools rather than metal screwdrivers to avoid damaging trim or airbags.
-
Follow existing wiring paths and rubber seals rather than forcing the cable through tight gaps.
-
Leave a small loop of slack at the camera end so you can tilt or remove the unit for cleaning or downloading footage.
-
Avoid routing cables across airbag covers or where they might restrict airbag deployment.
You do not need to remove lots of trim in many cars. Often, gently tucking the cable into gaps at the edges of pillars and headlining is enough.
Power options (12V socket vs hardwiring)
There are two main ways to power a dash cam in a UK car.
Using the 12V socket
This is the simplest and safest method for beginners.
-
Plug the supplied adapter into the 12V socket and the other end into the dash cam.
-
The camera usually turns on when the ignition is on and turns off when the car is off.
-
Installation takes minutes and does not involve any electrical work.
The main downside is that you will usually have one visible plug in the socket and possibly a small amount of cable near the centre console.
Hardwiring to the fuse box
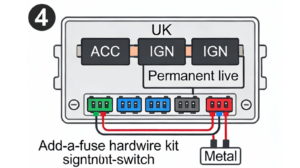
Hardwiring uses a dedicated kit to connect the dash cam to your car’s fuse box.
-
The kit typically uses a fuse tap and an earth (ground) point.
-
A professional or confident DIYer chooses a suitable fuse (often an “accessory” or “ignition‑switched” circuit) and connects the kit, so the camera comes on with the ignition.
-
Some kits also provide constant power for parking mode, allowing the camera to keep recording when the car is parked (with voltage cut‑off to protect the battery).
Hardwiring gives a very tidy look and frees up the 12V socket, but it is more involved. If you are unsure, using the 12V method or asking a professional fitter is often a safer choice.
7. Common mistakes to avoid
Being aware of typical mistakes can save frustration and help you stay within UK rules.
Blocking your view
Mounting the camera too low or in the central line of sight can break the rules about windscreen obstruction and may cause an MOT issue.
Ignoring airbag areas
Running cables across airbag covers, especially along the A‑pillars, can interfere with deployment in a crash. Always route cables around these areas, not through them.
Leaving loose cables
Cables hanging near pedals, the steering column or gear lever can be a hazard. Tuck them away securely.
Not checking power behaviour
Some cars keep the 12V socket live even when the ignition is off. This can cause the dash cam to stay on and slowly drain the battery. It is worth testing whether your camera turns off when the car is off.
Forgetting to set the date and time
Incorrect timestamps can make footage harder to use as evidence. A quick check when you first install saves problems later.
Never checking the memory card
Cards can fill up, fail, or become corrupted. It is sensible to review a clip now and then and format the card occasionally following the manufacturer’s advice.
8. Legal considerations for dash cams in the UK
Dash cams are legal in the UK, but there are a few rules and responsibilities to keep in mind.
Placement and visibility
-
Devices must not significantly obstruct the driver’s view through the windscreen.
-
For MOT and road safety, items should not project noticeably into the area swept by the wipers in front of the driver.
-
Mounting behind or close to the rear‑view mirror at the top of the screen is generally considered acceptable when done carefully.
Incorrect placement could lead to penalties and may cause problems during an MOT test, so it is worth taking this seriously.
Privacy, passengers and data
Because dash cams record video (and sometimes audio), UK data protection rules can apply, especially if you record other people such as passengers or members of the public.
Key points:
-
If you record inside the vehicle (for example taxis, private hire, driving instructors), you should inform passengers that they are being recorded.
-
Audio recording is more sensitive; many people choose to switch audio off unless they have a clear reason to keep it on.
-
If you share footage online, avoid clearly identifying individuals (for example number plates and faces) unless you have a valid reason and are sure it is lawful.
Insurance and evidence
Many UK insurers accept dash cam footage as part of a claim, and some offer discounts if you use a camera that meets their criteria. It is worth checking your policy documents to see whether they have any specific requirements about camera use or access to recordings.
You can also provide footage directly to the police if you witness dangerous driving or an incident. Some UK police forces now accept dash cam clips via online portals.
A dash cam can quietly support you every day on UK roads. By choosing a safe mounting position, routing cables neatly, and understanding the basic legal points, you can install one yourself at home without needing technical skills or sales extras.
If you’re still choosing a dash cam, see our comparison of the best dash cams for 2026.